When you change 3D printing height, each layer matters. Lower layer heights usually make surfaces smoother and parts stronger. Higher heights print faster but can lower strength and detail. Studies show thinner layers help surface finish and compressive strength. You can see this in the table below:
| Property/Aspect | Effect of Lower Layer Height |
|---|---|
| Surface Roughness | Smoother finish |
| Compressive Strength | Increased strength |
| Print Resolution | Higher detail |
| Print Time | Longer |
Picking the right height lets you balance speed, quality, and strength for better results.
Key Takeaways
- Use thinner layers (0.1–0.15 mm) for smoother surfaces and stronger prints, but printing will take longer.
- Thicker layers (0.3–0.4 mm) print faster, but the surface will be rougher and the parts will not be as strong.
- A 0.2 mm layer height is a good choice for most projects because it balances speed, quality, and strength.
- Always match your layer height to your nozzle size. Keep the layer height between 25% and 75% of the nozzle diameter.
- Pick your layer height based on what you want your print to do. Use thicker layers for quick prototypes. Use thinner layers for detailed models. Use a middle layer height for parts that need to work well.
- Lower layer heights help the layers stick together better. This makes the print stronger and harder to break.
- If your print looks rough or the layers are weak, try using a lower layer height. You can also slow down the print speed or change the temperature.
- When you use new materials, print a small test first. This helps you find the best layer height for strength and how the print looks.
3D Printing Height Basics
Definition
You can think of 3D printing height as the thickness of each layer your printer lays down. Each time your printer moves up, it adds another thin slice of material. This vertical thickness is what people call the layer height. When you set a smaller layer height, your print will have more layers stacked on top of each other. This setting changes how your finished part looks and feels.
Measurement
You measure 3D printing height in millimeters (mm). Most printers let you choose a layer height between 0.1 mm and 0.5 mm. The nozzle size on your printer sets the limits for this range. For example, a common nozzle size is 0.4 mm. With this nozzle, you can usually print layers from about 0.1 mm up to 0.3 mm. Larger nozzles, like 0.6 mm or 0.8 mm, allow for thicker layers. The table below shows typical ranges:
| Nozzle Diameter (mm) | Typical Max Layer Height (mm) | Typical Min Layer Height (mm) | Notes |
|---|---|---|---|
| 0.4 | ~0.3 | ~0.10 | Max height is about 80% of nozzle diameter |
| 0.6 | ~0.48 – 0.50 | N/A | Larger nozzle, thicker layers possible |
| 0.8 | ~0.60 – 0.64 | N/A | Max height approaches 80% of nozzle diameter |
Tip: For most prints, try to keep your layer height between 25% and 75% of your nozzle diameter. This helps you get good strength and detail.
Role in Printing
You control 3D printing height using slicer software. This software lets you pick a fixed layer height or even change it for different parts of your model. Many users choose 0.2 mm for a balance of speed and quality. If you want more detail, you can lower the height to 0.1 mm. For faster prints, you can raise it closer to the maximum your nozzle allows. Slicer software also lets you set the layer height as a percentage of your nozzle width. This makes it easy to match your settings to your printer’s hardware. When you adjust 3D printing height, you change how smooth, strong, and fast your print will be.
Surface Finish

Visual Quality
Fine vs. Coarse Layers
When you change the layer height, you change how your print looks. Lowering the layer height makes each layer thinner. This helps your print look smoother and more detailed. If you use a higher layer height, the layers become thicker and more visible. You will notice more lines on the surface, and the print may look rough.
Here is a table that shows the differences between using 0.1 mm and 0.3 mm layer heights:
| Aspect | Visual and Physical Differences Between 0.1 mm and 0.3 mm Layer Heights |
|---|---|
| Surface Finish | 0.1 mm layers produce smoother surfaces and better curves; 0.3 mm layers result in rougher surfaces. |
| Detail Quality | 0.1 mm layers capture finer details, ideal for decorative or detailed prints; 0.3 mm layers are less detailed, suitable for larger, simpler models. |
| Print Speed | 0.3 mm layers print faster due to fewer layers; 0.1 mm layers take longer. |
| Strength | 0.1 mm layers improve layer adhesion and overall strength; 0.3 mm layers may weaken the print. |
| Z-axis Resolution | 0.1 mm layers provide better resolution along the Z-axis, enhancing detail accuracy; 0.3 mm layers reduce this precision. |
Detail and Smoothness
If you want your print to show fine details, you should use a lower layer height. Settings around 0.1 mm or even less will help you get a smooth surface and sharp features. This is great for models that need to look good, like figurines or display pieces. Lower layer heights also help curves and sloped surfaces look more natural. You will see fewer visible lines, and the print will feel smoother to the touch.
Tip: For the best surface finish in FDM 3D printing, use a layer height of 0.1 mm or less. This setting gives you high detail and a smooth look, but it will take more time to print.
Texture
The texture of your print depends on the layer height you choose. Lower layer heights create a soft, almost polished feel. You can run your finger over the print and feel very little roughness. Higher layer heights make the print feel bumpy. You will notice the steps between layers, especially on curved or sloped surfaces. If you want a model that feels smooth, always choose a lower layer height.
Common Issues
You may run into problems if you set the layer height too high or too low. Using a high layer height can cause rough surfaces, especially above supports or on overhangs. The printer has trouble making smooth steps, so the bottom of overhangs can look messy. You might also see more visible lines and less detail.
If you use a very low layer height, you will get a smoother finish, but the print will take much longer. Sometimes, going below 0.1 mm does not make a big difference in surface quality, especially with FDM printers. You may spend more time printing without seeing much improvement.
- Common surface finish issues with high layer heights:
- Rough surfaces above supports
- Poor overhang quality
- Visible layer lines
- Common surface finish issues with very low layer heights:
- Longer print times
- Diminishing returns in smoothness below 0.1 mm
Note: For most prints, a layer height between 0.1 mm and 0.15 mm gives you a good balance of smoothness and print time. You can also improve surface finish by calibrating your printer, reducing flow rate, and printing at slower speeds.
Strength

Layer Adhesion
Bonding
You want your 3D prints to stay together under stress. The way each layer sticks to the next is called layer adhesion. When you use a lower 3D printing height, the layers press together more tightly. This helps the melted plastic bond better, making your print stronger. If you increase the layer height above 0.2 mm, the bond between layers gets weaker. Tests on PLA show that prints with 0.3 mm layers break sooner under pressure. At 0.4 mm, the parts can barely hold any load. You may see gaps between the lines of filament, which means the layers did not stick well. This happens because thicker layers do not melt and fuse as much as thinner ones.
Tensile and Shear
Tensile strength tells you how much pulling force your print can handle before it snaps. Shear strength measures how well the layers resist sliding apart. Both depend on how well the layers bond. When you use a smaller layer height, you get higher tensile and shear strength. The table below shows how layer height affects tensile strength for different materials:
| Material | Layer Height (mm) | Average Tensile Strength (MPa) |
|---|---|---|
| PLA | 0.1 | 32.00 |
| PLA | 0.2 | 30.19 |
| PLA | 0.3 | 28.75 |
| PETG | 0.1 | 33.52 |
| PETG | 0.2 | 30.37 |
| PETG | 0.3 | 29.45 |
| PETGCF | 0.1 | 28.46 |
| PETGCF | 0.2 | 24.40 |
| PETGCF | 0.3 | 22.52 |
You can also see this trend in the chart below. As the layer height increases, the tensile strength drops for all materials.

Tip: For strong prints, keep your layer height at or below 0.2 mm, especially if you use a 0.4 mm nozzle.
Durability
Durability means your print can last longer and handle more use. You can improve durability by choosing the right layer height, infill, and shell thickness. Lower layer heights help the layers stick together, which makes the print less likely to crack or break. If you want even more strength, increase the infill percentage. More infill means more plastic inside the print, so it can take more force. Shell thickness also matters. Thicker shells help your print resist bending and shearing. For the best results, use a low layer height (0.15–0.2 mm), high infill (80–100%), and at least two or three shell walls.
- More infill = higher strength for most properties.
- Lower layer height = better bonding and fewer weak spots.
- Thicker shells = stronger against bending and impact.
You should remember that these settings work together. If you use a high layer height, even a strong infill will not fix weak layer bonds.
Failure Modes
If you pick the wrong layer height, your print can fail in several ways. Using a layer height that is too high for your nozzle size causes poor adhesion. The filament cools too fast and does not stick well. This leads to weak spots between layers. You might see your print split apart, shift layers, or even fall apart during use. If the layer height is too low, you can get smearing and surface defects because too much plastic squeezes out.
Common failure modes include:
- Layer separation (layers peel apart)
- Layer shifting (layers move out of place)
- Poor adhesion (weak bonds between layers)
- Smearing and surface defects (from too low a layer height)
Note: Always keep your layer height about 20% smaller than your nozzle diameter. This helps you avoid most adhesion problems and print failures.
Optimal Ranges for Strength
You want your prints to be strong and reliable. The best range for layer height is between 0.15 mm and 0.2 mm when you use a standard 0.4 mm nozzle. This range gives you good layer bonding and strong parts. If you go above 0.2 mm, you risk weaker prints. If you go below 0.1 mm, you get stronger prints but much longer print times. For most projects, staying in the 0.15–0.2 mm range balances strength, quality, and speed.
Quick Guide:
- Use 0.15–0.2 mm layer height for strong, durable prints.
- Combine with high infill and thick shells for best results.
- Avoid layer heights above 0.3 mm if you need strength.
Balancing Finish and Strength
When you choose your print settings, you often need to decide what matters most: how your part looks or how strong it is. You can adjust your layer height to match your goal. Sometimes, you want a beautiful finish. Other times, you need a part that can handle stress. Many prints need a balance between the two.
Prioritizing Appearance
If you want your print to look as smooth and detailed as possible, you should focus on appearance. You can follow these tips:
- Use thinner layers, such as 20–30 microns (0.02–0.03 mm), to make layer lines almost invisible. This works well for jewelry, miniatures, or display models.
- Expect longer print times. Thinner layers can take 1.5 to 3 times longer than thicker ones.
- Choose thin supports for smoother surfaces. Thin supports leave fewer marks but need slower print speeds.
- Adjust exposure times carefully. Thin layers and supports need the right exposure to keep details sharp and surfaces smooth.
- Print slowly for intricate models. Slow speeds help keep fine features and surface quality, even if it means the part is less strong.
Tip: If you care most about how your print looks, accept longer print times and use the thinnest layers your printer can handle.
Prioritizing Strength
Sometimes, you need your print to be tough and reliable. In these cases, you should focus on strength:
- Use thicker layers, such as 0.2 mm or higher, for faster prints and stronger layer bonds.
- Choose higher infill and thicker walls to boost durability.
- Avoid very thin layers if you need the part to handle stress or weight.
- For mechanical parts or tools, thicker layers help the print resist breaking or cracking.
Note: Thicker layers print faster and can make parts stronger, but you will see more visible lines and less detail.
Compromise Settings
Most prints need both good looks and solid strength. You can find a middle ground by using mid-range layer heights. A setting like 0.2 mm works well for many projects. This height gives you decent surface finish, strong layer adhesion, and reasonable print times. Many people use 0.2 mm as a default because it balances speed, quality, and strength. For common materials like PLA or PETG with a 0.4 mm nozzle, 0.2 mm is a smart choice. You get prints that look good and hold up well without waiting too long.
Quick Guide:
Use 0.2 mm layer height for general-purpose prints. This setting gives you a good mix of detail, strength, and speed.
Choosing Layer Height
Material Considerations
You need to match your layer height to the material you use. Some materials, like PLA and PETG, work well with a wide range of layer heights. Others, such as flexible filaments or composites, may need special settings. If you print with a standard material, you can usually choose between 0.1 mm and 0.3 mm. For specialty filaments, check the manufacturer’s recommendations. Some materials bond better with thicker layers, while others show more detail with thinner ones.
Tip: Always test a small print first when you try a new material. This helps you find the best layer height for strength and appearance.
Print Purpose
You should always consider the purpose of your print before choosing a layer height. The right setting depends on whether you want a quick prototype or a finished, detailed part.
Prototypes
When you need a prototype, speed matters most. You can use a higher layer height, such as 0.25 mm to 0.3 mm. This setting prints faster and uses less material. The surface may look rough, but you can see the shape and test the fit. If you plan to sand or paint the part later, a rougher finish is fine.
- Use 0.25–0.3 mm for quick prototypes.
- Save time and material.
- Accept visible layer lines and less detail.
- Good for checking size, fit, or function.
Functional Parts
For functional parts, you want strength and durability. A mid-range layer height, like 0.15 mm to 0.2 mm, works well. This range gives you strong layer bonding and a smoother finish. If your part needs to look good, use a lower layer height, such as 0.1 mm to 0.15 mm. If you plan to post-process the part, you can use a higher layer height and smooth it later.
- Use 0.15–0.2 mm for strong, reliable parts.
- Choose 0.1–0.15 mm for high detail or smooth surfaces.
- Consider post-processing if you want both speed and a good finish.
| Print Purpose | Recommended Layer Height | Notes |
|---|---|---|
| Rapid Prototype | 0.25–0.3 mm | Fast, rough, good for fit checks |
| Functional Part | 0.15–0.2 mm | Strong, balanced, everyday use |
| Detailed Model | 0.1–0.15 mm | Smooth, slow, best for fine details |
Speed vs. Quality
You must balance speed and quality when you pick a layer height. Higher layer heights print faster because the printer lays down fewer layers. This saves time, but you will see more visible lines and a rougher surface. Lower layer heights take longer, but they give you finer details and smoother curves. If you print a large, simple object, use a higher layer height to finish quickly. For small or detailed models, use a lower layer height for the best results.
- Higher layer heights (0.3–0.4 mm): Fast prints, rough finish, less detail.
- Lower layer heights (0.1–0.15 mm): Slow prints, smooth finish, sharp details.
- Mid-range (0.2 mm): Good balance for most projects.
Note: Adaptive layer height settings in slicer software can help you get both speed and quality. The printer uses thicker layers for simple areas and thinner layers for detailed spots.
Advanced Tips
Printer Limits
You need to know what your printer can handle before you set your layer height. Most FDM printers work best with layer heights between 0.08 mm and 0.28 mm when using a standard 0.4 mm nozzle. Your printer’s firmware and slicer software will stop you from setting a layer height that is too high or too low. If you try to print with a layer height above 80% of your nozzle diameter, the layers may not stick well. If you go below 0.10 mm, you will see longer print times with little improvement in quality. The first layer is often thicker, around 0.20 mm, to help the print stick to the bed. Newer printers use automation for bed leveling and nozzle cleaning, which helps you keep your layer height consistent and reduces print failures.
Nozzle Size
Nozzle size sets the rules for your minimum and maximum layer height. You cannot use a layer height greater than your nozzle diameter. For example, with a 0.4 mm nozzle, your maximum layer height should stay below 0.32 mm. Most slicers suggest keeping your layer height between 20% and 70% of the nozzle diameter. This means a 0.4 mm nozzle works best with layer heights from 0.08 mm to 0.28 mm. If you use a larger nozzle, you can print thicker layers, which speeds up your print. Smaller nozzles let you use thinner layers for more detail. Always match your layer height to your nozzle size for the best results.
Tip: Set your first layer height to about half your nozzle diameter. This helps your print stick to the build plate and gives you a strong base.
Troubleshooting
If you see rough surfaces or poor layer bonding, you can fix these problems with a few simple steps:
- Lower your layer height for a smoother finish.
- Slow down your print speed to help layers bond better.
- Adjust your nozzle temperature to match your filament. Each material has its own best range.
- Make sure your filament is dry. Wet filament can cause uneven layers.
- Clean or replace your nozzle if you see clogs or uneven extrusion.
- Check your extruder gears for wear or dirt.
- Use an enclosure or control room temperature to avoid drafts and sudden changes.
- Set your layer height to about 25% less than your nozzle diameter for strong bonding.
Note: Modern printers use sensors and automation to help you avoid many common problems. Regular maintenance and careful calibration will keep your prints looking their best.
Recent advances in 3D printing have made it easier to get good results. Automated bed leveling, nozzle cleaning, and flow calibration help you keep your layer height steady. These features reduce human error and make your prints more reliable. By balancing print speed, temperature, and layer height, you can get strong, smooth prints every time.
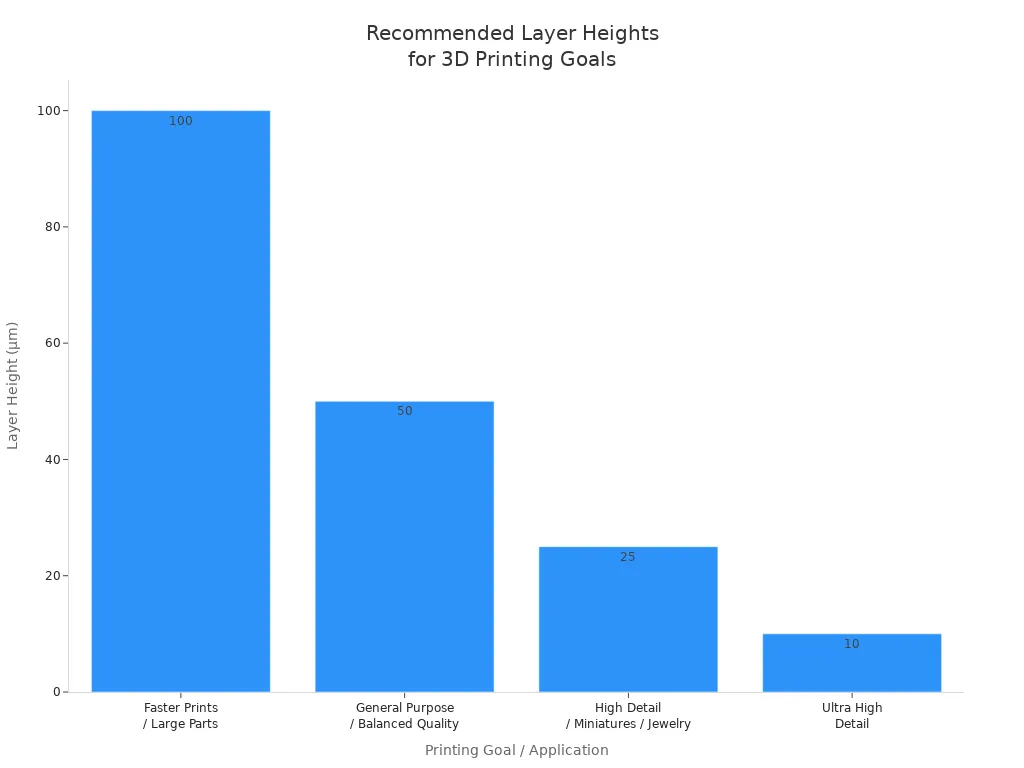
Quick Reference Table
Layer Height Guide
You can use this table to quickly choose the best layer height for your 3D printing project. Each goal has a recommended range and a short explanation. This helps you decide what matters most—speed, strength, or surface finish.
| Printing Goal / Application | Recommended Layer Height (mm) | What to Expect |
|---|---|---|
| High Strength / Durable Parts | 0.1 – 0.15 | Stronger prints, better layer bonding, smooth finish |
| Best Surface Finish / Fine Detail | 0.1 – 0.15 | Smoother surfaces, sharp details, longer print time |
| Balanced Quality and Speed | 0.2 | Good mix of strength, detail, and print speed |
| Fast Prints / Prototypes / Large Parts | 0.3 – 0.4 | Quicker prints, visible lines, less detail/strength |
Tip: Always match your layer height to your nozzle size. Use 25% to 75% of the nozzle diameter for best results. For a 0.4 mm nozzle, stay between 0.1 mm and 0.3 mm.
You can also see how different goals compare in this chart:
Key Takeaways
You can make better prints by remembering these key points:
- Thinner layers (0.1–0.15 mm) give you smoother surfaces and stronger parts.
- Thicker layers (0.3–0.4 mm) print faster but show more lines and may be weaker.
- For most projects, 0.2 mm is a safe choice for balance.
- Always check your printer’s limits. Most FDM printers work best with layer heights between 0.1 mm and 0.3 mm.
- Material matters. PLA works well with thin layers. Composites or flexible filaments may need thicker layers.
- The purpose of your print guides your choice:
- Use thicker layers for quick prototypes or large models.
- Use thinner layers for decorative or detailed objects.
- Use mid-range layers for functional parts that need both strength and a good look.
- Test and adjust your settings for each new filament or project.
Remember: Thinner layers improve detail and strength but take more time. Thicker layers save time but reduce quality and strength. Find the right balance for your needs.
You can use this guide to make quick decisions and get the best results from your 3D printer every time.
You can improve your prints by matching layer height to your project’s needs and material. A well-leveled bed and the right settings help you get strong, smooth results. Try different layer heights to see what works best for your printer and material. Many users test settings like 0.1 mm for detail or 0.3 mm for speed.
Share your favorite settings or questions in the comments—your experience helps others learn!
FAQ
What is the best layer height for beginners?
You should start with a 0.2 mm layer height. This setting gives you a good balance of print speed, strength, and surface quality. Most printers and slicers use this as the default because it works well for many projects.
Does a lower layer height always mean a better print?
No, a lower layer height gives you smoother surfaces and more detail, but it also increases print time. Sometimes, you will not see much improvement below 0.1 mm, especially with FDM printers.
How does nozzle size affect my layer height choice?
You must match your layer height to your nozzle size. For a 0.4 mm nozzle, use a layer height between 0.1 mm and 0.3 mm. Larger nozzles allow thicker layers, while smaller nozzles work best with thinner layers.
Will higher layer heights make my prints weaker?
Yes, higher layer heights can reduce strength. Thicker layers do not bond as well, so your print may break more easily. For strong parts, use a layer height of 0.15 mm to 0.2 mm.
Can I change layer height during a print?
Some slicer software lets you use variable layer heights. You can print thicker layers for simple areas and thinner layers for detailed spots. This saves time and improves quality where you need it most.
What should I do if my layers are not sticking together?
Try these steps:
- Lower your layer height.
- Increase nozzle temperature.
- Slow down print speed.
- Make sure your filament is dry. These changes help improve layer bonding and print strength.